Wednesday, 19 February 2014

Posh looking coconut and white chocolate cakes

The first time I made a coconut cake was when I was baking for a friend who doesn’t like chocolate or fruit cakes and since then I kept baking it again and again because everyone seemed to like it.
I loved the idea of an entirely white dessert. But I wanted to make it look cleaner, more professional and sophisticated, so I thought: why not simply make it smaller?


For 4 cakes (7 cm diameter) you will need:

For the sponge:
50 g butter (room temperature)
80 g powdered sugar
1 tbsp vanilla sugar
1 egg
120 g flour
1 small tsp baking powder
120 ml coconut milk (try to find one with a high coconut extract percentage)

For the filling:
100 g white chocolate
6 tbsp coconut flour
200 ml whipping cream
1 tsp vanilla sugar
2 gelatine sheets

For decoration (optional):
20 g white chocolate
roasted and chopped almonds


In a bowl, beat together the butter and sugar with an electric mixer for about a minute. Add the egg and mix that for another minute. You can do this in a stand mixer or a food processor or anything with a whipping attachment.


Sift the flour and baking powder to get rid of any lumps. Then start adding the flour and coconut milk to the mixture, alternating between the two. Once it’s all well mixed together, you can transfer it to a baking tray lined with parchment paper.


Bake at 180°C for 15 to 20 minutes.


Let the sponge cool slightly, then transfer it to a cutting board. With a dessert ring cut 8 circles out of your sponge. These will be the bases and tops of the cakes.


To make the filling, you first need to melt the chocolate over a pot of boiling water. Mix it with coconut flour and set aside to cool.


In another bowl, whip the cream with the vanilla sugar (this can be substituted with a teaspoon of regular sugar and a teaspoon of vanilla). When it’s almost firm, add melted gelatine and beat some more.

When the chocolate and coconut flour mixture is completely cooled, you can mix it with the cream. Refrigerate for about 30 minutes.


Now it’s time to assemble the cakes. Start with a layer of sponge, add some filling (about two tbsp), then cover with another layer of sponge. Press it down so the filling distributes itself evenly.


Decorate the cakes any way you like. I topped mine with some melted white chocolate and roasted almonds.


Transfer the cakes onto a serving plate and remove the dessert rings. And you’re done!


TIP: For these cakes you WILL need dessert rings. If you don’t have them, however, you can also do this in a form of one larger cake. For a standard size cake, double the quantities all the ingredients and bake the sponge for a little longer (approx. 25-30 min).


Sunday, 12 January 2014

Guilt-free egg white cookies

I really can’t say enough good things about these cookies. They are gluten free. They are lactose free.  They are low-carb and very low-fat. They are made using only three ingredients. They are extremely easy to make and are prepared in no time. And they are very delicious.

Though much less sweet, they somewhat resemble macaroons with their soft centre and crunchy outside. Unfortunately they can’t be stored for too long, because they tend to lose their crunch after a few days.

All in all they offer a healthier alternative to your everyday snacks without compromising the taste. Next time you have leftover egg whites, give these a try.


For about two trays of cookies you will need:

4 egg whites
100 g ground walnuts (about 1 cup)
3 tbsp agave syrup


Beat the egg whites until almost firm, then add the agave syrup. Beat until they start forming stiff peaks.


Add the walnuts and mix on lowest speed just enough to thoroughly combine all the ingredients.


Fill a piping bag with the mixture and pipe small cookies onto a baking tray lined with parchment paper.


Bake at 150°C for 20 minutes.


TIP: Leaving the egg whites sitting in the fridge for one or two days will make your whites easier to beat and your cookies rounder and prettier. This trick is often used for making macaroons.

A batch made with egg whites that sat in the frigde for two days

Monday, 23 December 2013

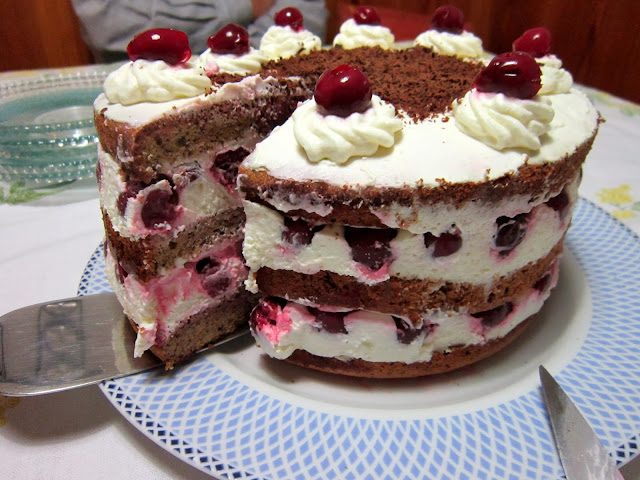
Sponge cake with sour cherries

Every time someone is about to have a birthday I find myself planning excitedly everything from the shape and size of the cake to the flavours and ingredients I want to incorporate. Lately I've been returning to this recipe again and again because it's easy to make yet looks quite festive and pleases many different tastes.


You will need:

For the cake (16 cm Ø tin):
4 eggs, separated
4 tbsp flour
4 tbsp sugar
1 package vanilla sugar
2 tbsp grated chocolate
3 tsp cocoa powder

For the filling:
250 ml whipping cream
250 g mascarpone
200 g sour cream
2 tbsp sugar
2 gelatine sheets
1 package vanilla sugar

For assembling the cake:
a large jar of sour cherries, drained (save the syrup)
2 tbsp amaretto
2 tbsp grated chocolate


Make the cake

In a bowl beat the egg whites with an electric mixer until they form stiff peaks. In a larger bowl, mix the egg yolks with sugar and vanilla sugar, and beat that, too, until the mixture is pale and fluffy.


Sift the flour into the bowl with egg yolks and add the egg whites, then fold everything together gently with a spatula. Add the grated chocolate and cocoa powder and fold them in, too.


Pour the mixture in a tin, lined with parchment paper. Bake at 200°C for 25 to 30 minutes.

Once you take it out of the oven, let it cool down. Then remove it from the tin and even out the top if necessary before you cut it in three equally thick layers.


Make the filling:

Whip the cream with the sugar and vanilla sugar, then add the mascarpone and sour cream. Melt the gelatine and pour it into the mixture while beating it with an electric mixer.


Assemble the cake:

Place the cake ring on your serving plate. Start with the first cake layer. Moisten it with a few tablespoons of sour cherry juice and amaretto mixture, and then cover it with the filling. Place the sour cherries on top and press them into the filling. Then repeat the process until you reach the last layer of cake.
Save a couple of sour cherries if you plan on using them on top of your cake as decoration.

I "accidentaly" put in "a little" more amaretto than
I initially planned. And it turned out just fine.
 

Keep in mind that the cherries on the outer edge
are the ones you will see once you remove the cake
ring so you might want to spend an extra
minute arranging them evenly along the edge.


Cover the top with a thin layer of filling. Remove the cake ring. You should still have enough filling left to cover the sides of the cake too, if you wish. I, however, was very excited about using a cake ring for the first time, so I skipped this step (although my layers were not the perfection I was going for; I will need to refine my technique in the future).


Put the rest of the filling in a piping bag and decorate the top any way you like. Top with sour cherries and finish off with some grated chocolate.


Refrigerate for a few hours before serving.


Saturday, 14 December 2013

Beyond sexy chocolate lava cakes

This dessert is made to impress. It is the kind of food that will not only get you lots of compliments and moans of pleasure at your table, but even wedding proposals.


It has taken me a lot of time and experimenting to achieve what I think is the perfect lava cake and I really hope you give my recipe a try.

For four ramekins (7 cm diameter) you will need:

120 g dark chocolate (about 70% cocoa solids)
80 g butter (+ another tbsp for greasing)
3 tsp cocoa powder
50 g flour
3 tbsp brown sugar
1 package vanilla sugar (or 1 tbsp sugar + 1 tsp vanilla extract)
2 eggs
2 egg yolks
a pinch of salt


Grease the ramekins very generously with butter.

Melt the chocolate and butter over a pot of boiling water or in a microwave.


With an electric mixer beat the eggs, egg yolks, sugar and vanilla sugar for a few minutes or until it gets pale and foamy. Add the chocolate mixture and a pinch of salt and mix it again. Sift in the flour and cocoa powder. Mix it until all the ingredients have come together.


Divide the mixture between the ramekins, then cover them with plastic foil and put them in the fridge for half an hour.


Preheat your oven to 200°C and bake for about 11 or 12 minutes.


Let them rest for about 15 minutes before you serve them. Then flip them out of the ramekins and onto a plate, sift with confectioner’s sugar and serve with whipped cream or vanilla ice cream.


NOTE: The baking time really depends on your oven so you will have to figure out your perfect baking time for yourself. The good news is that even if you overcook them, these lava cakes will still be highly edible and delicious. If you undercook them, they won’t come out of the ramekins so when you're making them for the first time and you aren’t sure if they are cooked or not, it might be a good idea to serve them in the ramekins.

You can prepare these in advance and leave them in the fridge for up to two days (more might still work, but two days is the most I have done and can vouch for) and bake them before you wish to serve them. If they sit in the fridge for a long time they will probably take two or three minutes more to bake than usual.

Wednesday, 4 December 2013

Grandma's fabulous cookies

This is my all time favourite recipe for cookies. I got it from my grandma who's been making them since I can remember. They are one of those things you cannot stop eating once you start and although she always makes them in enormous quantities, she still has to hide them from my ever-hungry grandpa to prevent him from eating them all at once.

I like to make them for Christmas, wrap them up and give them to my friends and family. Then I spend the money I would have otherwise spent on gifts for others on gifts for myself.
They are easy to make and can be stored for quite some time so you can make them in advance.


You will need:

500 g flour
250 g butter (very cold and cut into small pieces)
150 g brown sugar
1 package vanilla sugar (can be substituted with 1 tbsp sugar and 1 tsp vanilla extract)
3 eggs
100 g ground walnuts (or hazelnuts or almonds)
½ package baking powder
½ tsp cinnamon


This makes about 4 trays of cookies.

Sift the flour, baking powder and cinnamon into a large bowl. Add the butter. Using your hands rub and crumb them together until there are no large chunks of butter visible.


The flour and butter mixture will look almost like flour or almond meal if you persist long enough.
This can take some time and patience; a food processor will greatly speed up the process so if you have one, now is the time to use it.


When baking these cookies, a food processor is your best friend.
Next add the sugar and eggs and start kneading. Lastly, knead in the nuts. If you want, you can transfer the dough from the bowl to a hard and well floured surface at this point, but I personally really don’t find this necessary. 


Baking cookies is all about getting your hands dirty.

Now the dough needs to rest. Cover it with plastic foil and put it in the fridge for about an hour.

Now the fun part begins. You can shape your cookies any way you like. The only thing to keep in mind is that all the cookies on the tray should be about the same thickness.


Bake (depending on the size and thickness) at 190°C for 11 to 17 minutes.


These cookies are great on their own or dipped in chocolate.